
What it means
Before thinking about a possible profit, state what would make the trade idea wrong. An invalidation level ties the plan to an observable price event. A stop order is an execution tool that may help act on that plan; it is not the same thing as guaranteed execution at a chosen price.
Suppose an imaginary account has 1,000 units of equity and a trader chooses a planned loss budget of 10 units for one example trade. This is an arithmetic illustration, not a recommended account size or risk percentage.
Assume each 1-unit price move changes profit or loss by 1 per unit held. With entry at 100 and an intended stop at 98, the price risk is 2 per unit. Ignoring costs initially, the size is 10 ÷ 2 = 5 units. The position's total market value, or notional exposure, is 5 × 100 = 500. If all five units enter at 100 and exit at exactly 98, the price loss is 10.
For this example: position size = planned loss budget ÷ (entry-to-stop distance + estimated costs per unit).
Now allow 0.20 per unit for estimated round-trip fees and slippage. Estimated risk becomes 2.20 per unit, so the same budget supports 10 ÷ 2.20 ≈ 4.54 units, rounded down to a valid order size. At a 0.1-unit increment, 4.5 units has estimated loss of 9.90. An adverse gap can still make the actual loss larger.
This simple arithmetic assumes a linear payout in compatible units. Contract multipliers, inverse contracts, currency conversions, minimum order sizes and venue rules can change the calculation. Verify the instrument before applying a formula.
In CoinScreener
Signals display reference trade levels where access permits. Use them to understand the setup, then calculate using the price and size actually available to you. CoinScreener's historical assumptions are not personalised account settings.
An alert identifies a condition and leaves the trade plan to you. Any entry, stop and target you choose need their own rationale. Read the alert and signal guide for the distinction.
A stop-market order becomes a market order when triggered, subject to venue rules. It can execute worse than the trigger in a fast or gapping market. A stop-limit order sets a price constraint but can remain unfilled. Neither choice removes market risk.
Margin is collateral associated with a leveraged position. It is not the same as the position's notional exposure or a guaranteed loss limit. Raising leverage can reduce required initial collateral while leaving the same position sensitive to the same price movement.
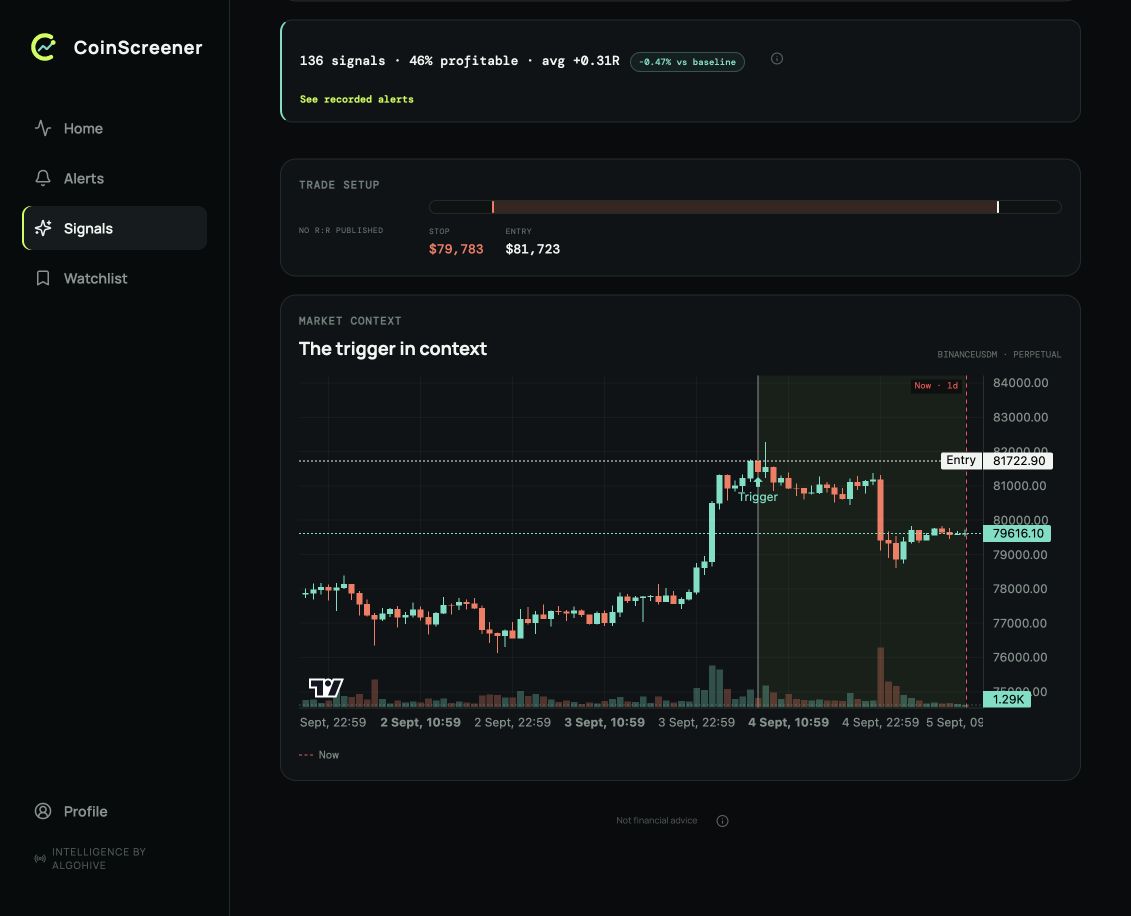
Read the displayed stop and entry before calculating your own position size. This ETHUSDT Signal has no published fixed target or reward-to-risk ratio, so do not invent one from the chart. These reference levels are not orders in your account.
Three checks
- Define the market, direction and price evidence supporting the idea.
- Calculate size using actual entry distance, contract terms and estimated costs.
- Round down to permitted increments and check minimum order requirements.
Explore examples
Explore the chart lesson
Compare the distances between entry, stop and target. The hypothetical long has entry 100, stop 98 and target 104: 2 units of price risk for 4 units of potential reward, or 2:1 before costs. The short example uses entry 100, stop 102 and target 96, giving the same ratio in the opposite direction.
Before the setup
This hypothetical example will introduce an entry, stop and target. Watch when the levels become available, then compare the different outcomes. It is not a Polaris Signal.
Illustrated walkthrough · all scenarios
Long setup
- Before the setup. This hypothetical example will introduce an entry, stop and target. Watch when the levels become available, then compare the different outcomes. It is not a Polaris Signal.
- A hypothetical trade plan. The original idea has entry 100, stop two price units away and target four units away: 2:1 reward-to-risk before costs. A stop is an intended exit, not a guaranteed fill.
- Manage the risk you planned. An open trade's gain or loss is not a closed result. Review actual fills and total exposure; the chart cannot decide an appropriate size for your account.
- The target is crossed. The candle reaches the hypothetical target. The line crossing alone is not proof of your fill. Verify the trade status, execution and costs.
Short setup
- Before the setup. This hypothetical example will introduce an entry, stop and target. Watch when the levels become available, then compare the different outcomes. It is not a Polaris Signal.
- A hypothetical trade plan. The original idea has entry 100, stop two price units away and target four units away: 2:1 reward-to-risk before costs. A stop is an intended exit, not a guaranteed fill.
- Manage the risk you planned. An open trade's gain or loss is not a closed result. Review actual fills and total exposure; the chart cannot decide an appropriate size for your account.
- The target is crossed. The candle reaches the hypothetical target. The line crossing alone is not proof of your fill. Verify the trade status, execution and costs.
Stopped out
- Before the setup. This hypothetical example will introduce an entry, stop and target. Watch when the levels become available, then compare the different outcomes. It is not a Polaris Signal.
- A hypothetical trade plan. The original idea has entry 100, stop two price units away and target four units away: 2:1 reward-to-risk before costs. A stop is an intended exit, not a guaranteed fill.
- Manage the risk you planned. An open trade's gain or loss is not a closed result. Review actual fills and total exposure; the chart cannot decide an appropriate size for your account.
- The stop is crossed. The candle trades through 98. Real execution can be worse than the stop price because of gaps, slippage or liquidity. A losing outcome must fit the risk budget.
Late entry
- Before the setup. This hypothetical example will introduce an entry, stop and target. Watch when the levels become available, then compare the different outcomes. It is not a Polaris Signal.
- A hypothetical trade plan. The original idea has entry 100, stop two price units away and target four units away: 2:1 reward-to-risk before costs. A stop is an intended exit, not a guaranteed fill.
- The price has already moved. Entering at 102 with the original stop at 98 and target at 104 risks 4 to seek 2: only 0.5:1 before costs. The old reward-to-risk no longer describes this entry.
- The target is crossed. The candle reaches the hypothetical target. The line crossing alone is not proof of your fill. Verify the trade status, execution and costs.
Switch to Late entry. Buying at 102 while keeping stop 98 and target 104 risks 4 to seek 2: 0.5:1 before costs. The trade that appeared attractive at its reference entry may be unattractive by the time you open the notification.
Sources
Product behavior checked against V3 source on 9 September 2026. Screenshots retain their original capture dates.
CME Group: Margin — Know What's Needed Investor.gov: Types of Orders